
Agent Development Kit(ADK)を試す
2025年04月23日
ADKGemini
cloud shellの環境でAgent Development Kit(ADK)を試したメモ 公式のQuickstartに沿って試す
https://google.github.io/adk-docs/get-started/quickstart/
環境のセットアップ
python -m venv .venv
source .venv/bin/activate
pip install google-adk
プロジェクトの作成
以下のようなプロジェクト構成を作る必要があるらしい
parent_folder/
    multi_tool_agent/
        __init__.py
        agent.py
        .env
multi_tool_agent ディレクトリの作成
mkdir multi_tool_agent/
init.py の作成
echo "from . import agent" > multi_tool_agent/__init__.py
agent.py の作成
まずファイルを作成する
touch multi_tool_agent/agent.py
ファイルの内容を以下で置き換える
import datetime
from zoneinfo import ZoneInfo
from google.adk.agents import Agent

def get_weather(city: str) -> dict:
    """Retrieves the current weather report for a specified city.

    Args:
        city (str): The name of the city for which to retrieve the weather report.

    Returns:
        dict: status and result or error msg.
    """
    if city.lower() == "new york":
        return {
            "status": "success",
            "report": (
                "The weather in New York is sunny with a temperature of 25 degrees"
                " Celsius (41 degrees Fahrenheit)."
            ),
        }
    else:
        return {
            "status": "error",
            "error_message": f"Weather information for '{city}' is not available.",
        }

def get_current_time(city: str) -> dict:
    """Returns the current time in a specified city.

    Args:
        city (str): The name of the city for which to retrieve the current time.

    Returns:
        dict: status and result or error msg.
    """

    if city.lower() == "new york":
        tz_identifier = "America/New_York"
    else:
        return {
            "status": "error",
            "error_message": (
                f"Sorry, I don't have timezone information for {city}."
            ),
        }

    tz = ZoneInfo(tz_identifier)
    now = datetime.datetime.now(tz)
    report = (
        f'The current time in {city} is {now.strftime("%Y-%m-%d %H:%M:%S %Z%z")}'
    )
    return {"status": "success", "report": report}

root_agent = Agent(
    name="weather_time_agent",
    model="gemini-2.0-flash",
    description=(
        "Agent to answer questions about the time and weather in a city."
    ),
    instruction=(
        "You are a helpful agent who can answer user questions about the time and weather in a city."
    ),
    tools=[get_weather, get_current_time],
)
.env の作成
.envファイルを作成する
touch multi_tool_agent/.env
以下の内容に書き換える(今回はGemini APIを使うので、GOOGLE_API_KEYのみ上書きする )
# If using Gemini via Google AI Studio
GOOGLE_GENAI_USE_VERTEXAI="False"
GOOGLE_API_KEY="paste-your-actual-key-here"

# # If using Gemini via Vertex AI on Google CLoud
# GOOGLE_CLOUD_PROJECT="your-project-id"
# GOOGLE_CLOUD_LOCATION="your-location" #e.g. us-central1
# GOOGLE_GENAI_USE_VERTEXAI="True"
エージェントを実行するためのUIにアクセスする
プロジェクトのルートディレクトリに移動する
parent_folder/      <-- navigate to this directory
    multi_tool_agent/
        __init__.py
        agent.py
        .env
以下を実行する
adk web
以下のような画面が出てきて、ローカルホストの8000でplay groundが起動する
INFO:     Started server process [1927]
INFO:     Waiting for application startup.
+-----------------------------------------------------------------------------+
| ADK Web Server started                                                      |
|                                                                             |
| For local testing, access at http://localhost:8000.                         |
+-----------------------------------------------------------------------------+

INFO:     Application startup complete.
INFO:     Uvicorn running on http://0.0.0.0:8000 (Press CTRL+C to quit)
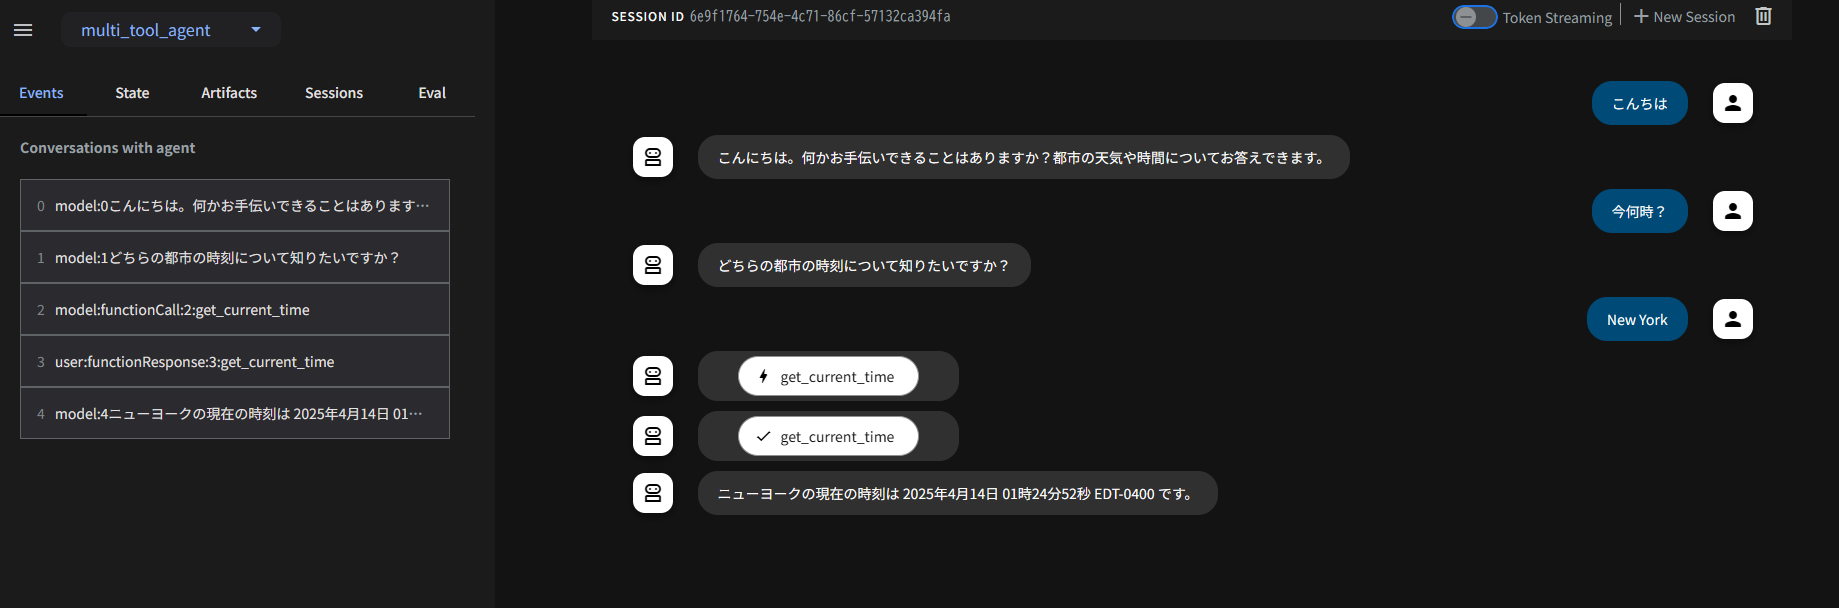
ローカルホストにアクセスし、左上のドロップダウンからmulti_tool_agentを選択し以下のように会話できます。
BigQuery MCPを使ったエージェントも作ってみる
.envに情報追加
以下の情報もenvに追加する
# Google Cloud Info
PROJECT_ID="" # プロジェクトID
LOCATION=""   # データセットのロケーション
KEY_PATH=""   # JsonキーのPath
サービスアカウントは以下のロールが必要となる
- roles/bigquery.user (recommended)
- OR both:
- roles/bigquery.dataViewer
- roles/bigquery.jobUser
agent.pyの実装
以下の感じでMCP使ったエージェント機能を実装する
MCPはこちらを使用する。 公式ではないものの、GoogleCloudのパートナーのOREDATAという企業がスポンサーのようなので、一旦信用して使用する。
デフォルトは1GBの検索上限になっているようなので、プロンプトの中でmaximumBytesBilled を指定してあげることで上限増やすことができる
# Add nest_asyncio to allow running asyncio.run within an existing event loop
import nest_asyncio
nest_asyncio.apply()

import os
import asyncio
from dotenv import load_dotenv
from google.genai import types
from google.adk.agents import Agent
from google.adk.agents.llm_agent import LlmAgent
from google.adk.tools.mcp_tool.mcp_toolset import MCPToolset, SseServerParams, StdioServerParameters

load_dotenv('.env')

# --- Helper function to initialize agent asynchronously ---
async def _initialize_agent():
    """Asynchronously fetches MCP tools and initializes the LlmAgent."""
    print("Attempting to connect to MCP BigQuery server and fetch tools...")
    # Load connection details from environment variables
    PROJECT_ID = os.getenv("PROJECT_ID")
    LOCATION = os.getenv("LOCATION")
    KEY_PATH = os.getenv("KEY_PATH")

    # Validate required environment variables
    if not PROJECT_ID:
        raise ValueError("Environment variable PROJECT_ID is not set.")
    if not LOCATION:
        raise ValueError("Environment variable LOCATION is not set.")
    if not KEY_PATH:
        raise ValueError("Environment variable KEY_PATH is not set.")
    if not os.path.exists(KEY_PATH):
         raise FileNotFoundError(f"Key file not found at path: {KEY_PATH}")

    tools, exit_stack = await MCPToolset.from_server(
        connection_params=StdioServerParameters(
            command='npx',
            args=[
                "-y",
                "@ergut/mcp-bigquery-server",
                "--project-id",
                PROJECT_ID,
                "--location",
                LOCATION,
                "--key-file",
                KEY_PATH],
        )
    )
    print(f"MCP Toolset created successfully. Fetched {len(tools)} tools.")

    agent = LlmAgent(
        model='gemini-2.5-pro-exp-03-25', # Adjust model name if needed
        name='BigQuery_agent',
        instruction='''You are a helpful agent who can answer user questions about data in BigQuery.
        Always check the table definition first.
        If a syntax error occurs, check the error, correct the SQL, and execute again.
        your SQL maximumBytesBilled is 10000000000.
        Please speak japanese.
        ''',
        tools=tools,
    )
    print("Agent initialized.")
    # Return both agent and exit_stack so cleanup can potentially be handled
    return agent, exit_stack

# --- Top-level Agent Initialization ---
print("Initializing agent at module level...")
try:
    # Run the async initialization function synchronously at the top level using nest_asyncio compatibility
    root_agent, mcp_exit_stack = asyncio.run(_initialize_agent())
    print("Agent initialization complete. 'root_agent' is now defined.")

    # NOTE on Cleanup:
    # The 'mcp_exit_stack' holds the context manager for cleaning up the MCP server connection.
    # In a typical script using 'async with', this would be handled automatically.
    # When run via ADK CLI, it's unclear if/how this cleanup is triggered.
    # If the MCP server process doesn't terminate after the CLI command finishes,
    # explicit cleanup logic might be needed.

except Exception as e:
    print(f"Error during agent initialization: {e}")
    # Raise the exception to prevent the module from loading incorrectly
    raise

# --- Remove old async_main and related code ---
# The ADK CLI framework will handle running the agent.